Preamble

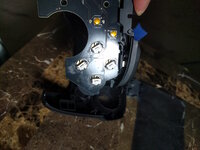
I spent almost all day on this. I was inspired by Bob Wulff making his Pro Controller more clicky and responsive (he is "WULFF DEN" on YouTube). I'm so proud of myself and very happy with the final result, even though it's nothing super complicated. I got some 3x6x4.3 switches, a tactile trigger set made for the bumpers, and a custom shell by ExtremeRate. Then I soldered the switches on (they are aligned that way to avoid other circuit lanes) and made some extra adjustments to the buttons (the switches are higher so I had to remove some of the button mass underneath). This is actually a 2 year old DIY by Mr. Wulff, but I wanted to do it myself. There are many Pro Controllers out there, but this one is mine.
Why the Switch Pro Controller?
I go between my Switch (usually w/ with friends like Smash Ultimate) and my PC (some I prefer controller on like Monster Hunter), so Steam's Switch compatibility layer makes it the perfect controller to seamlessly go between two gaming mediums. I haven't had any issues with input problems either, and I can also use the Switch controller to work with Switch emulators like Ryujinx and Yuzu.How error prone is it?
Every mistake (besides permanent destruction of the PCB) can be rectified. On the soldering step, there are ways to clean up excess or erroneous solder. The most "dangerous" step is removing the underside mass of the plastic face buttons, since the switches are higher than the height of the original membrane design. I used a semi wide drill bit, but it has an issue of drilling a spherical cavity into a cylindrical face. That causes the button to cup the button of the switch underneath, instead of actually pressing the plunger. I needed to reduce the height of the cylinder inside the button, so to literally iron out the curves, I took my soldering iron outside and kinda just melted and molded the plastic away where I needed (took care not to breathe in any fumes). This step... could definitely be done better by someone with better tools and brains than me. You also need to be careful not to tighten screws TOO much when reassembling the controller... Every excessively tightened screw can bring your switches another 0.05mm closer to the casing, which can end up pushing the plunger into the button and holding them pressed, or not enough room to bounce back and provide the tactile feedback.How does it feel?
It took me a bit to get used to, but I immediately noticed an improvement in how well I play. I don't mean that as marketing speech either. Using the Longsword in Monster Hunter World, sometimes you need to input ZR + [Face Button] to perform a move. The issue is, I think my membranes were having problems registering, so I was NEVER confident in whenever I pressed a button (notably ZR, and the Longsword uses ZR very frequently for its amplified attacks). Now, it feels extremely precise to perform combined input actions, and I don't need to get frustrated over only sending only one signal between ZR or one of ABXY. Also the tactile feedback is SUBLIME, even though some of my face buttons aren't perfectly spaced. That being said, the white switches I used require a tad bit more strength to push, but if you are a deliberate, quick-push-to-release type of button presser (look at pro players of any game pressing buttons and how fast they do it), it won't make much of a difference.Also, the custom shell actually feels better than the factory made one. It's more matte and rigid; not as smooth. Though, I wonder how well it holds up over time as it accumulates that gamer grime (aka dried up sweat) and frictional wear.
What else would I do?
As I get adjusted to using it, I may open it back up to adjust the click on the face buttons, since I had to eyeball the measurements. The buttons are feasible, but still not "perfect." That's something that will have to improve over time, and I make minor adjustments as time goes on. Someday I want to figure out how to mod the sticks to prevent snapback since it is still possible to occur, but at the moment it isn't an issue since I don't really play games that require stick flicks (if I were to play a game like Smash Ultimate seriously then yes, but I don't ever plan on doing that lol).What would've I done better?
For one, the soldering job. I was testing things out and the A button's switch ended up about 0.25mm higher than the rest, and I'm a noob at this electronics business so I just adapted by shaving the A button more. Other than that, I'm a nooby when it comes to hardware, so my planning was not as exhaustive of needs as it could have been.What about the D-Pad?
Even though it is a membrane, it isn't as bad as the face buttons. Honestly the D-Pad doesn't feel really bad to press; it's the main buttons that feel unresponsive, so I omitted doing anything to the D-Pad. However, I still tried to take a look at the D-Pad, and its exposed circuitry is much smaller than the ABXY buttons. I didn't have a plan, appropriately sized switch, nor the experience to add tactile switches to the D-pad, so I forgo'd it. Also, the minor buttons already have switches, in case you were wondering.What if I don't want to suffer through this?
You can actually buy a fully tactile modded Switch Pro Controller from GameTraderZero's website that includes a snapback compensator and the D-Pads. Of course, always consider cost vs convenience... and also the satisfaction of doing it yourself. I opted to do what I could by myself because I wanted to say... this was mine. Also, I gained experience and learned a lot.Pics
(lowkey flexing my ergonomic keyboard and drawing pen)
Resources
Original video inspiration by Bob Wulff:ABXY target was 3x6x4.3 White, but you might find a more preferable switch.
ExtremeRate Bumper Triggers: https://www.amazon.com/gp/product/B...de884bab477cf47e9c566a3fb49b7a&language=en_US
ExtremeRate Custom Shells: https://extremerate.com/
Attachments
Upvote
1